Reverse Engineering Code Art - Part 5
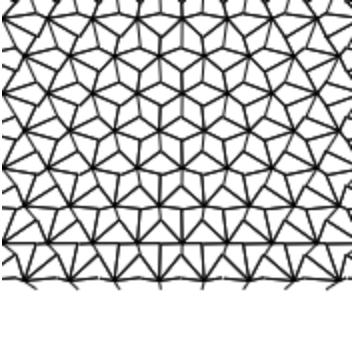
I absolutely love this one visually. It is based on the tessellation Rhombille tiling with stellations The math behind it is awesome and I had to revisit it to write this.
eval(unescape(escape`𤐽𬐽🡸𪑮𩑔𫰨𞀸𛱱𝐰𛱱𫱲🐱𪐽𨰮𭱩𩁴𪀽𝐬𫠽𤰨𭀩𞱸𭁲𫱫𩐨𩡯𬠨𮀮𨡥𩱩𫡐𨑴𪀨𪠽𝠩𦀽𩠪𨠽𪐯𩡼𝀴𛁙🐨𨠫𫠥𩠭𝀩𛰴𛁑𦀫👓👪𛰮𦐫👃`.replace(/u../g,'')))
Step 0: Extract from Unicode
The Unicode string is to reduce the number of characters used, each Unicode character contains 2 characters. 🐱 for example is =1 decoded. The entire dwitter decoded
Q=q=>x.lineTo(88+X/q*50,50+Y/q*50)
for(f=17,i=c.width=175,n=S(t);i--;x.stroke())for(x.beginPath(j=6);j--;Q(2-n))X=(i-t%1)%f*.9+(b=i/f|0)%2*.44-8,Y=(b+n%2%f-4)*3/4,Q(2),X+=S(p=j/.95)/2,Y+=C(p)/2;
Step 1: Format
c.width = 175   // This is used to set the width and clear the screen

let X, Y
const Q = (q) => x.lineTo(88 + (X / q) * 50, 50 + (Y / q) * 50);
const f = 17
const n = S(t)
const draw = (i, j) => {
  const p = j / 0.95;
  const b = (i / f) | 0

  X = ((i - (t % 1)) % f) * 0.9 + (b % 2) * 0.44 - 8;
  Y = ((b + ((n % 2) % f) - 4) * 3) / 4;
  Q(2)

  X += S(p) / 2
  Y += C(p) / 2;
  Q(2 - n)
}

for (let i = 175; i--; ) {
  x.beginPath()
  for (j = 6; j--; ) {
    draw(i, j)
  }
  x.stroke()
}
Well now the entire code looks like a normal canvas example. The entire thing is optimized for a width of 175, I can’t seem to scale it properly. Now to investigate the draw function and the Q function.
Step 2: Remove the elements which add time
const Q = (q) => x.lineTo(88 + (X / q) * 50, 50 + (Y / q) * 50);
const f = 17
const draw = (i, j) => {
  const p = j / 0.95;
  const b = (i / f) | 0

  X = (i % f) * 0.9 + (b % 2) * 0.44 - 8;
  Y = ((b - 4) * 3) / 4;
  Q(2)

  X += S(p) / 2
  Y += C(p) / 2;
  Q(2)
}
Now to understand how the Rhombille tiling is done
The values X = (i % f) * 0.9 + (b % 2) * 0.44 - 8; and Y = ((b - 4) * 3) / 4; represent the center of the point from which do draw. These two are constant
There is a neat little trick here to get 2 PI
// 6 / 0.95 = 2 * Math.PI
p = 6
const p = j / 0.95;
The iteration from p = 6 to 1 is to draw at every 60deg angles
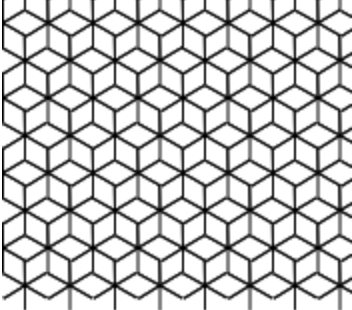
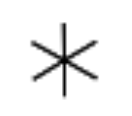
Running draw(160) over p a single star can be created.
When two stars intersect, a rhombi is created with two 60 deg and 120 deg angles
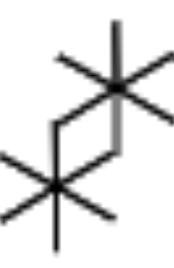
Repeating the process will create the Rhombille tiling tessellation
Step 3: Understanding the usage of time
Now let’s go back to the version of the code with time
const Q = (q) => x.lineTo(88 + (X / q) * 50, 50 + (Y / q) * 50);
const f = 17
const n = S(t)
const draw = (i, j) => {
const p = j / 0.95;
const b = (i / f) | 0
X = ((i - (t % 1)) % f) * 0.9 + (b % 2) * 0.44 - 8;
Y = ((b + ((n % 2) % f) - 4) * 3) / 4;
Q(2)
X += S(p) / 2
Y += C(p) / 2;
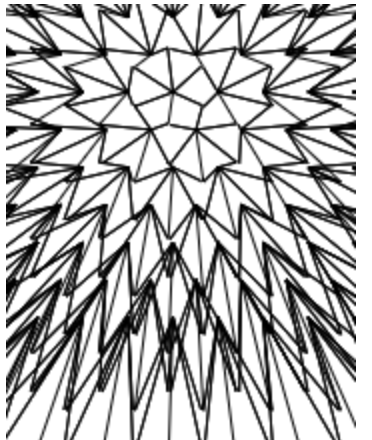
Q(2 - n) // Stellation
}
Adding Q(2 - sin(t)) adds the stellation effect. The other usage of time here is to give the moving effect, also to note in the moving effect the point have to be brought back to their original location